
Hello! Welcome to Part 1 of my Build Log for my Big Daddy cosplay. Like MrsGryphon’s Little Sister costume, this is my first attempt at cosplay. We’ve done our fair share of creating other costumes – We’re big fans of the local annual zombie walk and regional Renaissance Festivals – but we figured the upcoming local con, SiouxperCon, would be a great time to try our hand at cosplay!
MrsGryphon and I decided to do a Big Daddy and Little Sister cosplay. I’m big, she’s little, and we both like BioShock. I decided on the Big Daddy Bouncer, which I think is the most iconic of the Big Daddy varieties.

When I started planning my costume, I found myself headed into unknown waters. I’ve made a number of small, cobbled together props and some costume accessories over the years, but outside a few collaborations in college (building homecoming floats or making set pieces for charity events) I’ve never had a build on this scale . My most used methods for building things has, of late, involved 3D printing, epoxy, sanding, and painting. There was no way I’d be able to print this costume on my itty-bitty 3D printer, so I would have to try (gasp!) something new!
After a quick online search, and a not-so-quick days long YouTube binge, I had a basic idea of construction techniques (and the importance of EVA foam). I bought some foam, a backpack frame to build my costume on, an acrylic dome, and started building.
I’ve used quite a few different tools on the road so far; some I already owned, some I had to buy, and some I even made. My plan was roughly to just keep throwing tools at the foam until a costume spontaneously formed.
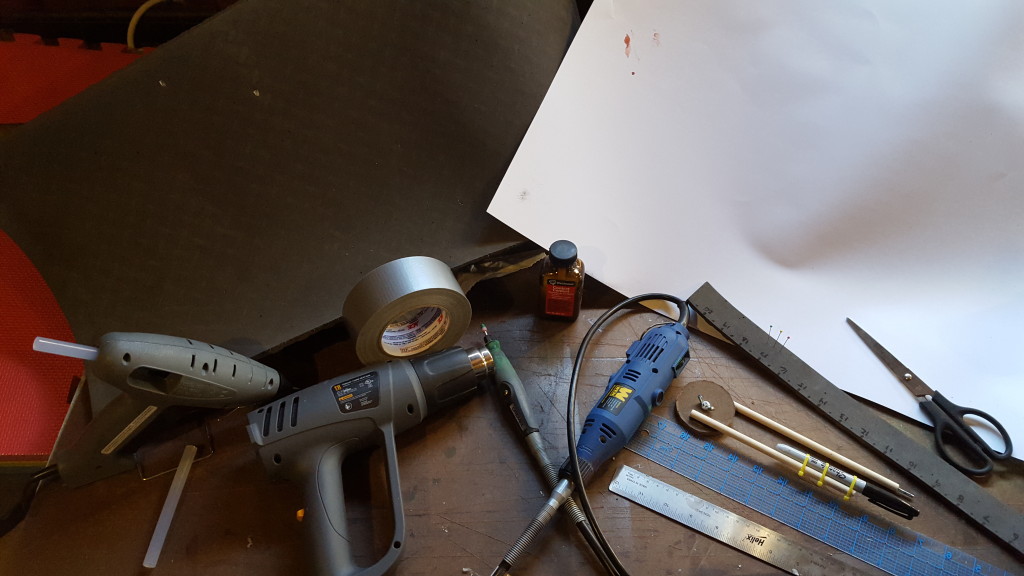
Before I start getting into detail on the build. I’d like to go over the tools and materials I used:
Critical
- EVA Foam
- I used two types of foam in this project; a roll of 1/4″ thick foam with a diamond plate pattern on one side and a smooth side, and squares of interlocking 1/2″ foam with a textures side and a smooth side.
- Most of my building was done with the smooth side out, and in some cases I had to use a rotary tool to smooth the back for gluing, but I did take advantage of the diamond plate and patterned sides when I thought the texture would be nice.
- Blade and sharpener
- I used two different types of blades: a utility knife (the type with snap-off blades), and a hobby knife (an x-acto knife)
- I kept both blades very sharp with a knife sharpener. Cutting foam dulls knife blades fast, and a dull knife is both tough (and dangerous!) to cut with and can leave ragged edges on your foam
- Glue
- I used DAP Contact Cement. I started off with a small bottle with a built in brush which I refilled from a larger can of DAP. I’ve heard Barge Contact Cement as the recommended cement for cosplay, but DAP was what the local hardware store stocked.
- Paint
- I’ve used spray paint for a base coat and acrylic paint to add details. In the future, I may have to track down some Plasti Dip for sealing and priming the foam.
With those few items, you can start building some cosplay costumes. You might not be able to get real crazy, but it’s a start.
More tools and materials to make life better
- Heat gun
- EVA foam is not terribly rigid, but it tends to want to spring back to whatever shape it was. A heat gun relaxes the foam, enough so that you can make complex curves if you need to, and the foam will, more-or-less, hold its new shape when cool.
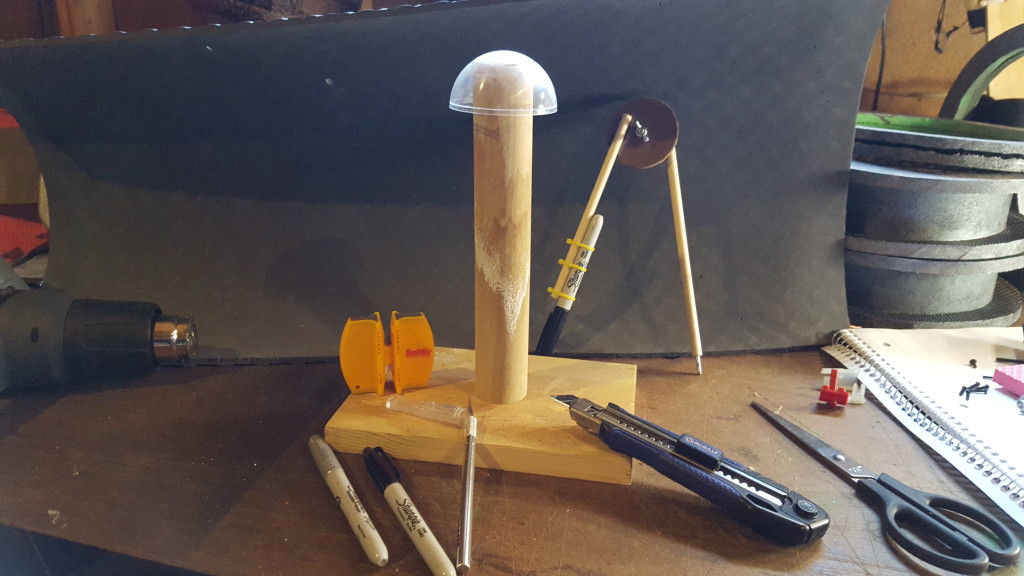
- Foam Anvil
- This is a piece of thick dowel mounted to a base with half of an acrylic Christmas ornament glued to the top of the dowel. It’s a great tool to help shape your heated foam.
- Inspired by veteran prop maker and YouTuber Evil Ted Smith (Check out his channel)
- Rotary Tool and Accessories
- A Dremel or similar rotary tool is helpful for shaping foam, engraving details, sanding seams, and adding “battle-damage” to your costume.
- A barrel sanding bit is great for shaping foam or changing the angle of an edge before gluing
- The composite stone sanding bits are great for engraving details or gouges to your foam
- Markers
- I’ve used two colors of Sharpie on this project; black and silver. Mostly, I mark things in black, but I use silver if I need to add other marks I don’t want to get confused or if I’m using a particularly dark material.
- Compass
- It’s nice to be able to draw a perfect circle. Because of the size of circles I would be drawing, and the ineffectual nature of my first attempts at circle drawing tools, I finally broke down and just made a giant compass out of materials in my shop and zip-tied a sharpie to one arm. It gets the job done and doesn’t look half-bad doing it!
- Rulers
- I have a a few different rulers I’m using:
- Classic wood yard stick. Makes a great straight edge for long lines and great for measuring distance longer then a foot but less than three feet.
- Metal ruler. Use it as you would any ruler. Also use it to make straight cuts with your blade.
- Clear quilting ruler. This is helpful when needing to draw perpendicular lines, and even has a few basic angles you can use as well.
- Foam ruler. I cut a strip of EVA foam and marked it like a ruler. It’s good for measuring curved surfaces, especially when you want to account for the thickness of a foam sheet in your measurement
- I have a a few different rulers I’m using:
- Tagboard
- A cheap material to use to make patterns and to mock-up pieces.
- Pins
- Straight pins for sewing are great for holding pattern to foam or for temporarily tacking small pieces of foam together when you wants to stare at them for awhile before finally gluing them in place.
- Hot Glue Gun
- Hot gluing your cosplay together is probably a cardinal sin among experienced cosplayers, but I, a mere neophyte, do not know better.
- I’ve used this on a few hidden joins where I was afraid contact cement might not cut it, and also on very obvious places where I thought it might look cool to have what appears to be a thick bead of weld. I actually have much more cosmetic hot glue than structural hot glue.
- Foil and Duct tape
- See a shape you want to copy? Wrap it in aluminum foil, cover it in duct tape, and you can cut it apart to make a pattern!
That’s all for now! Stay tuned for more posts on how I used all this to make a Big Daddy costume!