This article is part two of a series. If you’d like to learn how I made the dress for my BioShock Little Sister Cosplay, check out Part 1.
Before I continue with the dress tutorial, I figured I’d better spend some time explaining how I made the belt/sash. Maybe I’ll even include photos of the actual process this time!
Haha, nope. I forgot to take any. So you get bad drawings instead.
For the fabric, I used an off-white broadcloth, since (1) broadcloth is cheap and (2) if I’m going to dirty it up anyway it’s better to start with an off-white than a bright white fabric. To be specific, I used Sheermist Bamboo Cream Broadcloth, which was a little more sheer than I would have liked. But, whatever, it was on sale.
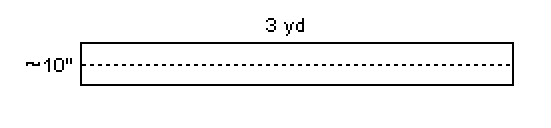
I ordered 3 yards and ended up using most of the fabric so the belt would be long enough for a big bow in the back. I did some estimates based on about how I wide I wanted the belt to be and came up with about 10 inches + seam allowance. Once I had my fabric cut, I folded the right sides together the long way (see image below) and sewed it together to form a tube.
Next, I refolded the fabric to place the seam in the center then ironed the fabric, but I’m not sure if this step was really necessary. I did it so the seam would be on the inside of the belt, but with the fabric being more sheer than I had expected the seam could still be seen from the front. I ended up folding the belt anyway, so the seam is hidden pretty well.
I wanted the ends of the belt to be pointed, so I sewed diagonal stitches from the sides to the center point (see below). I wasn’t feeling really picky so I didn’t measure any angles, but I did fold the belt to compare lines and make sure both sides were even.

Red = corner stitches
Of course now the belt was all sewn together, only it was inside out! Instead of messing with the ends, I took out a small section of the initial stitches I added when sewing the fabric together. Using this opening, I turned the belt right side out then re-closed the opening with some hand-stitching.
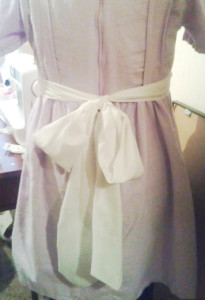
When wearing the belt, I folded it in half the long way to reduce the height of the belt. This covers the seam and makes the bow seem even larger in comparison.
Mr. Gryphon even researched how to tie a bow tie, so we can tie the sash into the perfect bow. In the example image, I just tied it “bunny ears” style which also looks really nice.
So as you can see, the belt was really easy to make. In fact, it was probably the easiest part of my costume. But I figured I would include the instructions for it, if only to satisfy the Completionist inside me.
Continue on to Part 3!